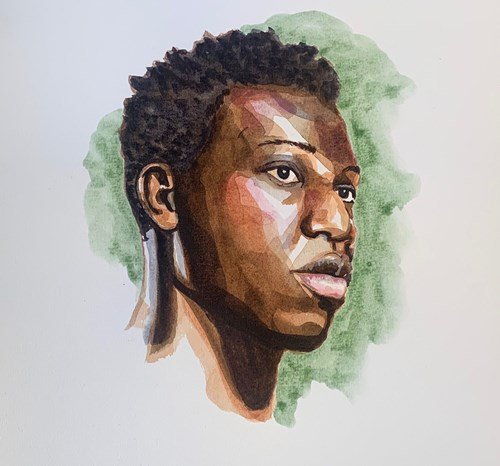
Step-by-step, layer-by-layer, here’s how to paint a portrait with deeper skin tones!
Plus: Granulating colours and how to work with them.
What You’ll Need:
- Painting palette
- Watercolour pencils
- Watercolour brushes
- Rembrandt or Van Gogh Watercolours
- Opaque white (106), Naples yellow deep (223), Gold ochre (231), Burnt umber (409), Burnt Sienna (411), Transparent oxide umber (417), Ultramarine deep (506), Cobalt violet (539), Permanent red violet (567) and Green earth (629)
- Rembrandt Watercolour Paper (100% cotton) or Van Gogh Watercolour block
Tips:
Watercolour is a painting technique, as the name says, using water. The amount of water you add determines the transparency of the paint. You will work with the white of the paper, from light to dark, by adding layers of paint.
- Each subsequent coat of paint cannot be added until the previous one is dry.
- Watercolour brushes range in size and shapes, allowing you to paint very fine and very coarse.
- Before you start, go through all the steps in this guide!
Step 1:
The Sketch
Make your sketch with a watercolour pencil – no. 348 used here. Also indicate the areas with shadows. Do not press too hard with the pencil, otherwise the indentations will be visible.

Step 2:
Warm Undertone
Mix Burnt Sienna (411) with some water. Our skin is alive and therefore needs a warm undertone. Apply the paint in one motion, leaving the spots where light falls on the skin. Let it dry for a while. Then use Burnt Umber (409).
Apply the paint with plenty of water and in one movement on the dried first layer. Go over the previous layer for a better colour gradient.

Step 3:
The First Shadows
Use Transparent oxide umber (417) to darken the skin a shade. Paint this layer only over the parts that really need to be darker. The structure of the layers will remain visible, which gives depth to the face.
This is also a good shade for the first layer of the hair!

Step 4:
More Shadows and Dark Areas
Mix Ultramarine deep (506) with Burnt Umber (409) for a warm black colour. Start with the darkest areas around the neck, jawline, along the hairline and as the second layer of the hair. Mix the same two colours with less water to work darker, for the eyes, the eyebrows and as second layer (structure) in the hair.

Step 5:
The Highlights
Mix Cobalt Violet (539) and Transparent Oxide Umber (417) with enough water. Cobalt violet is a granulating colour (characterized by the G on the tube) which gives a “grainy” effect. This effect works excellently for a life-like skin texture.
The mixture makes a bluish-gray, which will make the warm brown tones seem even warmer.
Finally, use only Cobalt Violet (539) to add accents.

Step 6:
The Finishing Touches
Eyes: Use Naples yellow (223) to give the white of the eye a realistic yellow tint.
Lips: Mix Permanent Red Violet (567), Cobalt Violet (539) and Opaque white (106) for the lower lip. Then mix more Opaque white in for the light grooves on the lips.
Face: Mix Burnt Umber (409) with Ultramarine dark (506) and little water for the last dark accents in the face. Then, mix Golden Ochre (231) with Opaque white (106) for the last light accents.
Background: Let the portrait dry first so that the background colour does not flow into the face. Use Green Soil (629) for the background. Try to keep the amount of empty space even around your portrait.
